
Do you want to build your own campervan?
Here is everything you need to know to build a campervan, step by step.
We share our tips and experiences along the way

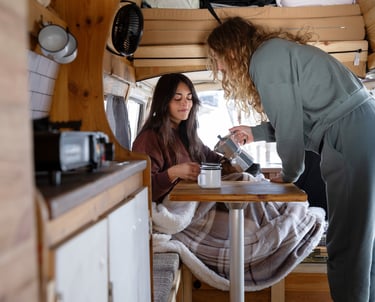
Dreaming of building a campervan and living the vanlife
Whether you want to travel full-time or just enjoy weekend adventures, a well-built campervan is the key to freedom.
In this guide, we’ll walk you through the entire build process, from insulation and electrical systems to water tanks and smart accessories. We share our expertise after building several campervans, both big and small. Plus, we recommend the best products we’ve personally used so you can build a safe, comfortable, and functional van without missing important details.
This post contains affiliate links, which means if you click on a product link and make a purchase from the retailer (Amazon, eBay, etc.), we may earn a commission. The price you pay remains unchanged, whether you use the affiliate link or not. By using these links, you support us in continuing to create free, educational content! To understand our policies on content, affiliate commissions, and responsibilities, please read our terms and conditions.
1: Define Your Budget & Needs
You need a clear budget before purchasing materials and equipment. Are you building a campervan for weekend getaways or full-time living?
How many people need to sleep in it?
Do you need a fixed kitchen, or will a portable solution suffice?
Purpose: Define what your campervan should be capable of.
Budget: Calculate costs for the van, materials, electrical setup, water system, and furniture.
Space: Adapt your design based on storage needs and movement space.
2. Choose the Right Van
Your choice of vehicle will significantly impact the practicality of your campervan. Popular options include:
Mercedes Sprinter – Perfect for larger builds and 4x4 conversions.
Ford Transit – A more affordable option with ample space.
Volkswagen Transporter – A compact size, ideal for weekend trips.
Peugeot Boxer / Fiat Ducato – Wide cargo area, great for full campervan conversions.
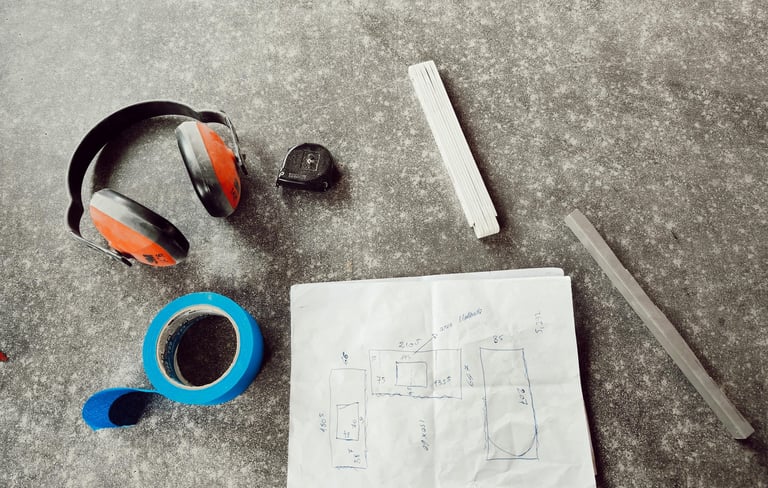
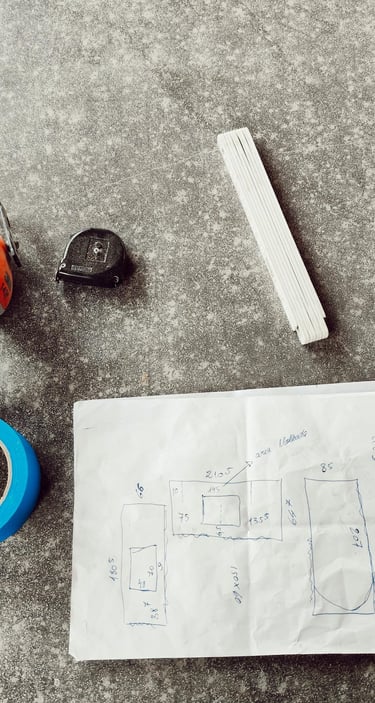
3. Sketch Your Layout
Once you have your van, the next step is to sketch your layout. Consider:
✔️ Sleeping Area – Fixed bed or convertible?
✔️ Kitchen – Gas stove or electric cooktop?
✔️ Storage – How to maximize space efficiently?
✔️ Electrical & Water System – Where will batteries and water tanks be placed?
✔️ Ventilation – Do you need a roof vent or extra windows?
A smart way to test your plan is to tape out the layout on the floor in a 1:1 scale before building.
Att bygga en campervan från grunden börjar alltid med en genomtänkt plan. Oavsett om du drömmer om en minimalistisk kompakt van eller en fullt utrustad husbil, är det viktigt att först bestämma dina behov och skapa en design som fungerar för din livsstil.
4. Plan Your Electrical & Water Systems
Electricity and water are two of the campervan's most important aspects. For electrical needs, decide if you want solar panels, leisure batteries, and an inverter for 230V. For water, choose between a fixed installation and portable solutions.


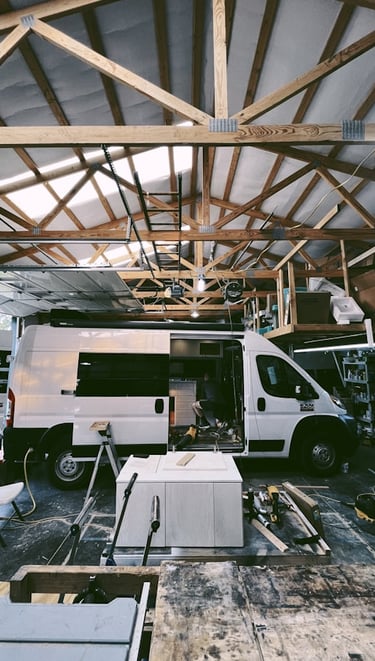
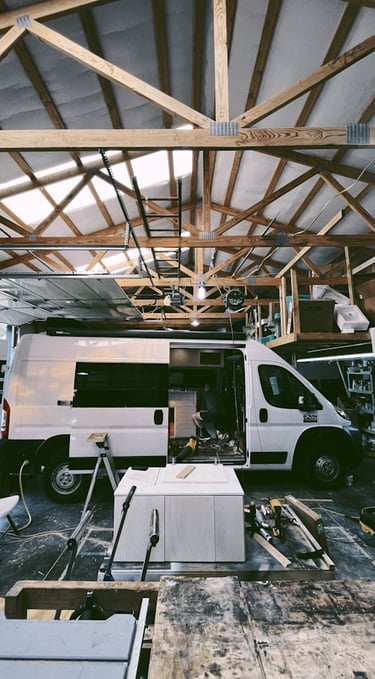
5. Get the Right Materials & Tools
Once your design is finalized, it's time to start building! Ensure you have the right tools and materials to avoid unnecessary delays.
Top 8 Must-Have Products for a Smooth Build
These essentials make the build easier and the journey more comfortable:
These gadgets make the build easier and the journey more comfortable:
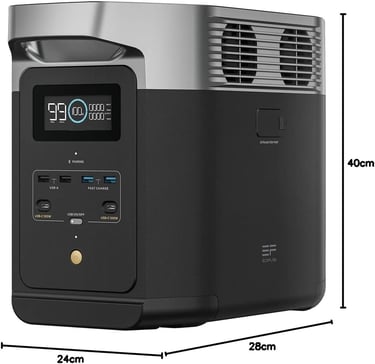
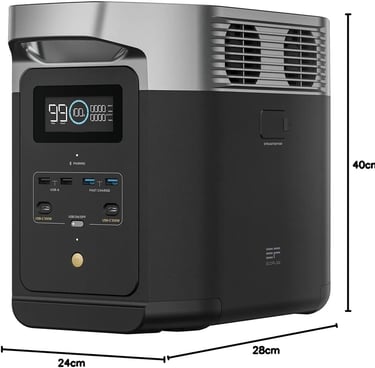
Portable Power Station: This is perfect for charging tools and devices
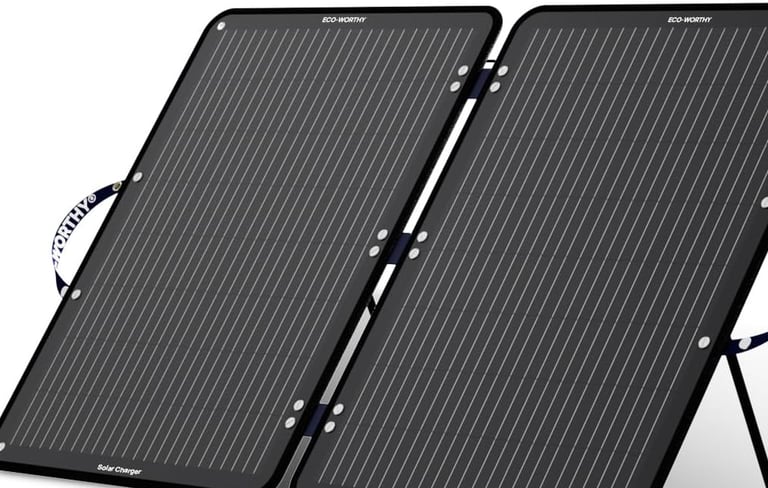
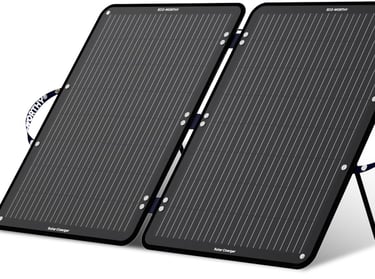
Solar Panels – For a self-sufficient campervan
Roof Fan – Keeps the van cool and provides better ventilation
Insulation Material – To keep the temperature comfortable all year round
Folding Workbench – Makes carpentry easier in tight spaces
Jumper Cables & Battery Tester – Ensures you never get stranded
Magnetic Locks for Cabinets – Prevent items from falling out during driving
LED Lights – Energy-efficient lighting for a cozy atmosphere
Part 2: Electrical System & Power Supply – How to Get Electricity in Your Campervan
Installing an electrical system in your campervan can feel overwhelming, but it's one of the most crucial parts of the build. A well-planned system allows you to charge devices, power a fridge, use lighting, and much more without constantly worrying about your battery level.
In this guide, we’ll cover how to choose the right battery, how to charge it, and what components you’ll need.
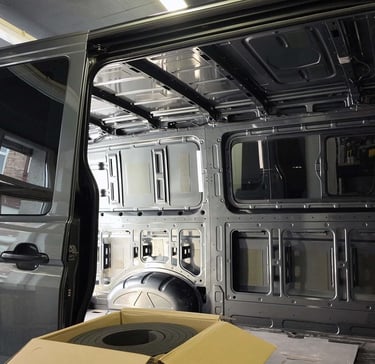
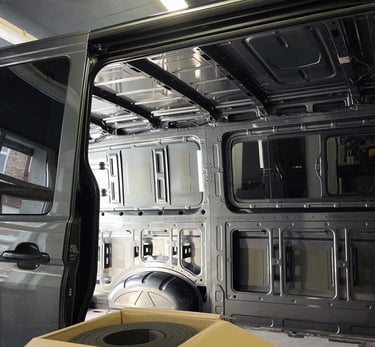
1. Why Insulation Is a Must in a Campervan
No matter if you plan to travel in warm or cold climates, insulation helps:
✅ Keep warmth inside during winter – Saves energy and makes the campervan more comfortable.
✅ Keep heat out during summer – Prevents the van from turning into an oven.
✅ Reduce condensation – Protects against moisture damage and mold.
✅ Soundproofing – Reduces road noise and makes sleeping easier.
Tip: Insulation takes up space! Choose materials that are effective but not too thick, especially if you're building in a smaller van.
2. Which Insulation Should You Use?
There are many types of insulation to choose from. Here are the most common options and their benefits:
🟢 Armaflex – The Most Popular Choice
✔️ Easy to install – Self-adhesive roll applied directly to the metal.
✔️ Moisture-resistant – Prevents condensation and mold.
✔️ Excellent thermal and acoustic insulation. 💰 More expensive than some other options but worth the investment.
🟡 Foam Board (XPS/EPS) – Good Budget Option
✔️ Cheap and easy to find.
✔️ Good thermal insulation.
❌ Requires careful sealing to prevent moisture issues.
🔵 Wool (Sheep Wool or Fiberglass) – Natural and Eco-Friendly
✔️ Excellent insulating properties.
✔️ Environmentally friendly and biodegradable.
❌ Requires a vapor barrier to avoid absorbing moisture.
🔴 Spray Foam Insulation – For Hard-to-Reach Areas
✔️ Perfect for tight spaces where rolls or boards won't fit.
✔️ Great insulating properties.
❌ Difficult to remove if applied incorrectly.
Recommendation: Many vanlifers combine Armaflex on walls and ceilings with XPS foam in the floor for the best results.
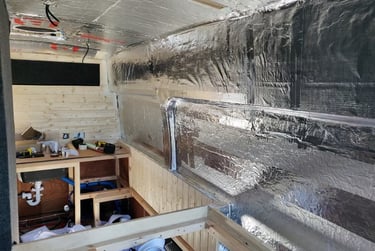
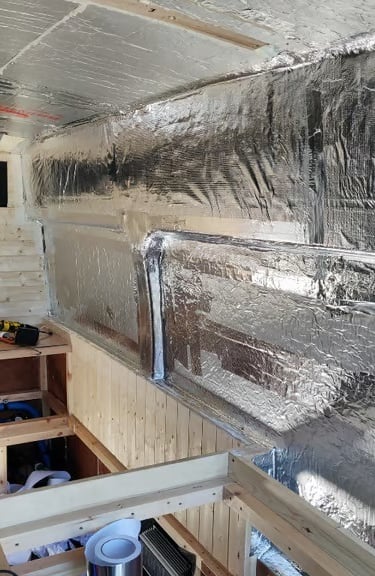
3. How to Insulate Your Campervan Step by Step
Step 1: Clean and Prepare the Surface
Before applying insulation, make sure the interior is clean, dry, and rust-free. If rust spots are present, sand them down and apply a rust protection treatment.
Step 2: Apply the Insulation
Roof and Walls – Start with Armaflex or wool. Cover as much surface as possible.
Floor – Use XPS or wooden boards. Add a protective layer on top to retain heat better.
Doors and Hard-to-Reach Areas – Fill any cavities with spray insulation or loose material.
Step 3: Sealing and Vapor Barrier
If using moisture-absorbing materials (such as wool), it’s crucial to use a vapor barrier to prevent condensation buildup.
Om du använder material som drar åt sig fukt (exempelvis ull), är det viktigt att använda en ångspärr för att förhindra kondensbildning.
4. Ventilation – Just as Important as Insulation
With proper insulation, you also need good ventilation to avoid condensation and poor air quality.
A. Roof Vent Fan – The Best Way to Ensure Airflow
A roof fan is almost mandatory in a campervan. It creates air circulation and helps cool down the van on hot days.
Popular Models:
MaxxFan Deluxe – Built-in thermostat and remote control.
Dometic Fantastic Fan – Powerful fan with low energy consumption.
B. Vents and Air Intakes
Besides a roof fan, you should have at least one additional vent to create airflow. Common options:
Floor vents (for fresh air intake).
Side windows with opening function.
Air vents in the rear doors.
C. Windows and Mosquito Nets
If you install opening windows, be sure to add mosquito nets so you can keep them open without letting in insects.
Top 8 Products You Shouldn't Forget for Insulation and Ventilation
Armaflex Insulation Roll – The best all-around insulation for walls and ceilings.
XPS Foam for Floors – Lightweight and effective insulation under the flooring.
Spray Foam Insulation – Ideal for hard-to-reach spaces.
Roof Vent Fan (MaxxFan or Dometic) – Essential for ventilation.
Air Vents – Ensures fresh air intake and reduces condensation.
Humidity Meter – Keeps track of moisture levels in your campervan.
Mosquito Nets for Windows – Allows ventilation without letting insects in.
Vapor Barrier (if using wool insulation) – Prevents moisture damage.
Step 3: Electrical System & Power Supply: How to Get Electricity in Your Campervan
Installing an electrical system in your campervan can feel overwhelming, but it's one of the most crucial parts of the build. A well-planned system allows you to charge devices, power a fridge, use lighting, and much more without constantly worrying about your battery level.
In this guide, we’ll cover how to choose the right battery, how to charge it, and what components you’ll need.
1. Plan Your Electrical System: What Do You Need Power For?
Before purchasing anything, ask yourself these questions:
✅ What devices will you use? (fridge, lighting, water pump, laptop, phone charging, etc.)
✅ How long do you want to be self-sufficient?
✅ Will you have access to external charging (campsites, mains power)?
✅ Do you want to use solar panels? Your answers will determine the battery size you need and the best way to charge it.
2. Choosing the Right Battery: What’s Best for Your Campervan?
There are three main types of batteries for campervans:
🔋 Lead-Acid Batteries (AGM/Gel) – Budget-Friendly Option
✔️ Cheaper than lithium
✔️ Simple installation
❌ Heavier and shorter lifespan
❌ Can only be discharged to 50% without damage Great if you're on a tight budget and can charge frequently.
🔋 Lithium Batteries (LiFePO4) – Best for Vanlife
✔️ Lightweight and compact
✔️ Can be discharged up to 90% without issues
✔️ Faster charging time
✔️ Lasts 5-10 times longer than lead-acid batteries
💰 More expensive upfront but cost-effective in the long run highly recommended for serious vanlife – more capacity for less weight.

3. How to Charge Your Battery
A battery is useless without a reliable charging source. The three most common methods are:
☀️ Solar Panels – Off-Grid Power
✔️ Perfect for wild camping without external electricity
✔️ Free and eco-friendly energy.
❌ Requires plenty of sunlight to be effective.
🔹 Recommended setup: At least 200–400W solar panels with an MPPT charge controller.
🚗 Charging via Vehicle Alternator (DC-DC Charger)
✔️ Charges your battery while driving.
✔️ A great backup when solar isn’t enough.
❌ Only works when the engine is running.
🔹 Recommended setup: 30A DC-DC charger from brands like Victron or Renogy.
🔌Mains Hook-Up Charging (230V Charger)
✔️ Fast and stable charging when at campsites.
❌ Requires access to mains power.
🔹 Recommended setup: 20-40A battery charger for AGM or lithium.
💡 Best combination?
👉 Polar panels + DC-DC charger = Ideal for long-term off-grid travel.
👉 DC-DC + 230V charger = Great if you frequently stay at campsites.
4. Other Essential Components for Your Electrical System
Once you have your battery and charging method sorted, you’ll need a few more components:
🟡 Inverter – To Run 230V Appliances
If you want to power a laptop, coffee machine, or hairdryer, you’ll need an inverter to convert 12V to 230V.
What should you choose?
500W inverter – Small devices (laptop, camera batteries).
1000W inverter – Suitable for a fridge, small coffee machine.
2000W inverter – For high-power appliances like induction hobs.
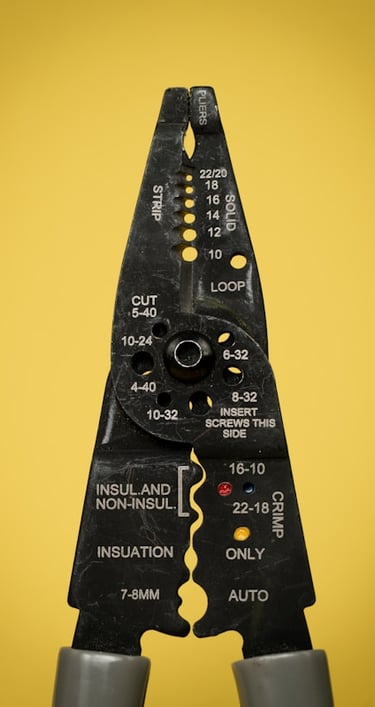
🔵 Fuses & Cables – For Safe Installation
🔹 Fuses protect your system from overload
🔹 Proper cable sizing is crucial to prevent voltage drops and overheating
🔹 Use at least 16mm² cables for larger systems
🟢 Power Distribution Panel – Easy Access to Your Electrical System
A fuse box or switch panel makes it easy to control lighting, fridge, and other devices.
5. Step-by-Step: How to Install an Electrical System
🔹 Calculate Your Energy Needs – List all devices and estimate your daily Ah consumption.
🔹 Choose the Right Battery Type & Size – At least 100Ah for short trips, 200-300Ah for full-time travel.
🔹 Plan Your Charging Methods – Combine solar, DC-DC charging, and mains charging as needed.
🔹 Install Your System – Connect batteries, fuses, chargers, and distribution panels.
🔹 Test Everything – Check voltage levels and charging efficiency.
Top 8 Must-Have Products for Your Electrical System
Lithium Battery (LiFePO4, at least 100Ah) – Lightweight, powerful, and long-lasting.
MPPT Charge Controller – Efficient solar charging.
DC-DC Charger (30A) – Charges your battery while driving.
Inverter (500W–2000W depending on needs) – To run 230V appliances.
Fuse Box & Cables (properly sized!) – For safe and efficient wiring.
Battery Monitor (e.g., Victron BMV-712) – To keep track of your battery status.
Step 4: Water & Sanitation – How to Get Running Water in Your Campervan
Having access to water in your campervan is essential for cooking, washing, and staying clean. Whether you opt for a simple jerry can or a more advanced pressurised water system, planning is key to a hygienic, sustainable, and low-maintenance water supply.
In this guide, we’ll cover how to install a functional water system, what components you’ll need, and how to manage wastewater and toilet solutions.
1. Choosing the Right Water System
What Suits Your Vanlife?
Before making a decision, consider how you’ll use water in your campervan
:
✅ Do you need running water with a tap and pump?
✅ Will you use a fixed or portable water tank?
✅ Do you want hot water?
✅ How will you manage greywater (wastewater from washing and showering)?
✅ Do you need a toilet solution?
Your answers will determine the type of tanks, hoses, and pumps you need to install.
2. Fresh Water Supply – Reliable & Safe Water Storage
There are two main ways to store and use water in your campervan:
🟢 Option 1: Portable Water Containers – Simple & Flexible
✔️ Easy to refill at petrol stations and campsites.
✔️ No fixed installation is required.
✔️ Affordable and great for short trips.
❌ Requires manual pumping or gravity feed.
🔹 Recommended setup: 20L jerry cans with a tap, paired with a foot pump or USB electric pump.
🔵 Option 2: Fixed Water Tank and Pressurised System – Maximum Comfort
✔️ Ideal if you want running water from a tap.
✔️ Connected to an electric pump to maintain water pressure.
✔️ Can be combined with a water heater.
❌ Requires more installation and takes up extra space.
🔹 Popular choice: A 50-100 litre fixed water tank mounted under or inside the campervan, connected to a pressurised water pump.
💡 Best solution?
👉 For short trips and small vans: Portable water containers with a manual pump.
👉 For longer journeys and larger vans: A fixed water tank with a pressurised pump.


3. Pumps and Water Flow:
How to Get Water from Your Tank
To access water from your tank, you’ll need a pump. There are three main types to choose from:
Electric Pressurised Water Pump – Convenient and Automatic
✔️ Provides running water directly from the tap.
✔️ Ideal for a fixed water tank.
❌ Requires electricity and can be noisy.
🔹 Popular choice: Shurflo 10L/min pressurised pump with an accumulator tank for steady water flow.
Foot Pump – No Electricity Needed!
✔️ Manual solution, no battery required.
✔️ Great for small campervans and simple setups.
❌ Can become tiring if you use a lot of water.
🔹 Popular choice: Whale foot pump.
🔹 USB Rechargeable Electric Water Pump – Cheap and Easy
✔️ Perfect for portable water containers.
✔️ Charges via USB and operates on demand.
❌ Best suited for small amounts of water.
🔹 Popular choice: Simple USB-powered water pumps for containers.
4. Grey Water Management – How to Dispose of Wastewater
Grey water is used water from washing up and showers. It needs to be handled responsibly to protect the environment.
💧 Option 1: Portable Grey Water Tank
✔️ A simple solution – a container under the sink.
✔️ Can be emptied at designated disposal points.
❌ Requires manual emptying.
🔹 Popular choice: 10-20 litre water container with a hose connection.
💧 Option 2: Fixed Underfloor Grey Water Tank
✔️ Holds more water and empties via a valve.
✔️ Ideal for longer trips.
❌ Requires installation and floor modifications.
🔹 Popular choice: 40-50 litre tank mounted under the campervan.
💡 Don’t forget! Use biodegradable cleaning products to protect the environment.
5. Toilet Solutions:
Which Type of Toilet Should You Choose?
If you want a toilet in your campervan, here are your main options:
🚽 Cassette Toilet (Chemical Toilet)
✔️ Easy to use and empty at campsites.
✔️ Compact and space-saving.
❌ Requires chemicals to reduce odours.
🔹 Popular choice: Thetford Porta Potti 365.
🌱 Composting Toilet – Eco-Friendly and Odour-Free
✔️ No odours, as urine is separated from solids.
✔️ No need for a water connection.
❌ Larger than a cassette toilet.
🔹 Popular choice: Nature’s Head or Separett Tiny.
🚦 No Toilet – Public Toilets and a Spade
✔️ No extra equipment needed.
❌ Can be inconvenient for frequent off-grid camping.
💡 Best solution?
👉 For short trips: Porta Potti or public toilets.
👉 For full-time vanlife: Composting toilet.
6. Top 8 Must:
Have Products for Water and Sanitation
✔️ 50L fresh water tank – Enough for several days.
✔️ Electric pressurised pump + accumulator tank – For a smooth water flow.
✔️ 20L portable grey water tank – Easy to empty.
✔️ Portable shower – Great for outdoor and off-grid use.
✔️ Composting toilet or Porta Potti – Practical toilet solution.
✔️ Water filter – Ensures clean and safe drinking water.
✔️ Biodegradable cleaning products – Eco-friendly choice.
✔️ Extra hoses and connectors – Useful for installation and maintenance.
This is just one part of your campervan build. Make sure to check out the next sections on interior design, storage solutions and vanlife security to get the most out of your adventure! 🚐🌍


Step 5: Maximize the space in your campervan!
When building a campervan, smart interior design and efficient storage are key to creating an organized, comfortable, and functional home on wheels. A well-planned interior makes your van both more attractive and practical to live in – whether you're traveling full-time or just on vacation.
In this guide, we'll go through how to plan your interior, optimize storage, and create a cozy and functional campervan.
1. Plan the interior – What is important to you?
Before you start building, it's important to think about your needs and how you want to use your campervan. Ask yourself the following questions:
✅ How much storage do you need?
✅ Do you want a fixed bed or a flexible solution like a sofa bed?
✅ How much kitchen space is needed?
✅ Do you need an indoor seating area?
✅ Are you bringing sports equipment or other bulky items?
Depending on your answers, you can choose a layout that suits your lifestyle.
💡 Tip: Draw a scaled sketch of your campervan to get a clear picture of how everything will be placed.
2. Bed Solutions – Fixed Bed or Convertible Sofa?
One of the biggest decisions in a campervan build is where and how you will sleep. Here are the most common options:
🛏️ Fixed Bed – Maximum Comfort
✔️ No need to make the bed every day.
✔️ Provides extra storage space underneath.
❌ Takes up more room, reducing seating space. 🔹 Popular choice: Raised platform bed with lift-up mattress and under-bed storage.
🛋️ Sofa Bed – Flexible and Space-Saving
✔️ Ideal for smaller campervans.
✔️ Doubles as a seating area during the day.
❌ Requires setting up each night.
🔹 Popular choice: Pull-out sofa bed with integrated storage.
💡 Best option?
👉 For long-term travel and maximum comfort: Fixed bed.
👉 For small vans and flexible use: Sofa bed.


3. Kitchen Storage:
Smart Organisation for Your Camper Kitchen
Your kitchen should be compact yet functional, allowing you to store all your cooking essentials without clutter.
💡 Storage tips for a well-organised kitchen:
🔹 Stackable and collapsible kitchenware saves space.
🔹 Magnetic spice jars on the wall keep spices easily accessible.
🔹 Pull-out drawers and baskets make it easier to reach items.
🔹 Hanging storage on doors or walls maximises space.
4. Clothing Storage – Keep Your Campervan Tidy
Keeping clothes organised in a campervan can be tricky, but with the right solutions, you can avoid clutter.
💡 Smart clothing storage solutions:
🔹 Packing cubes keep clothes neatly organised and easy to find.
🔹 Hanging fabric shelves maximise wardrobe space.
🔹 Vacuum storage bags compress thick clothing and bedding.
🔹 Under-bed storage boxes are perfect for extra clothes.
5. Storing Sports and Outdoor Gear
If you’re bringing bikes, surfboards, or other outdoor equipment, you need a storage solution that keeps them secure without taking over your living space.
💡 Storage tips:
🔹 Roof racks or rear-mounted bike carriers save interior space.
🔹 Under-bed storage boxes are great for smaller gear.
🔹 Slide-out drawers in the boot make accessing items easier.
6. Top 16 Must:
Have Products for Interior and Storage
Storage and Organisation:
Packing cubes – Keep clothes neatly sorted.
Collapsible storage boxes – Ideal for seasonal clothes and extra gear.
Vacuum storage bags – Compress clothes and bedding.
Pull-out storage drawers – Perfect for under-bed or boot storage.
Magnetic spice jars – Space-saving kitchen storage.
Hanging mesh baskets – Great for fruits and vegetables.
Fabric wardrobe organisers – Maximise hanging space.
Storage hooks and net pockets – Keep small items secure.
Sleeping and Seating Comfort:
Memory foam mattress – Better sleep on the road.
Foldable table – For meals and working.
Blackout curtains – Improve sleep quality and privacy.
Extra seat cushions – Perfect for guests.
Cosy Interior and Smart Lighting:
LED fairy lights – Create a cosy atmosphere.
Remote-controlled dimmable lights – Adjustable brightness.
Solar-powered lights – Great for outdoor use.
Air humidifier or essential oil diffuser – Improve indoor air quality.
Step 6: Safety and Practical Accessories for Vanlife
Living and traveling in a campervan means freedom, adventure, and independence, but it also means you need to think about safety. Whether you're camping in the wilderness or parking in a city, it's important to be prepared. In this step, we'll go through how to protect yourself, your campervan, and your belongings, as well as practical accessories that make vanlife easier and more comfortable.
1. Basic Safety – Protect Your Campervan
Your van is both your home and your vehicle, so keeping it safe should be a priority.
🔐 Locks and Theft Prevention:
• Extra door locks – Reinforce sliding and rear doors.
• Steering wheel lock – Adds extra theft protection.
• GPS tracker – Track your van if it gets stolen.
📷 Cameras and Alarms:
• Motion sensor alarms – Alert you to break-in attempts.
• App-connected security camera – Monitor your van remotely.
💡 Tip: Fake dash cams or security stickers can deter thieves.
2. Personal Safety – Protect Yourself
🛑 Self-Defence and Personal Safety Gear:
• Personal alarm spray – Effective against threats.
• Stun torch – Functions as both a flashlight and a defence tool.
• Pocket knife – Useful for both safety and practical tasks.
💡 Tip: Keep valuables out of sight and always park in safe locations.
3. Fire Safety – Be Prepared
🔥 Essential Fire Safety Equipment:
• Smoke detector – Alerts you to fire hazards.
• Carbon monoxide detector – Warns of dangerous gas leaks.
• ABC fire extinguisher – A must-have for any campervan.
• Fire blanket – Ideal for small fires.
💡 Tip: Regularly check gas installations and always ventilate when cooking.


4. Emergency Preparedness
Be ready for unexpected situations with these essentials:
• First aid kit – Includes bandages, antiseptic wipes, and pain relief.
• Solar/hand-crank emergency radio – Stay informed during power outages.
• Extra power banks – Keep devices charged.
• Reflective vest and warning triangle – Required in many countries.
💡 Tip: Learn basic first aid and how to handle gas or fire emergencies.
5. Practical Accessories That Make Vanlife Easier
Vanlife isn't just about safety – it's also about having a smooth and comfortable daily life on the road. Here are some smart gadgets that make life in a campervan easier.
🚐 Smart Solutions for Better Vanlife:
Collapsible sink: This saves space but is invaluable for cooking and washing dishes.
Collapsible water containers: Perfect for storing extra water.
Portable shower: To stay fresh even without fixed showers.
Solar-powered power bank: Charges your devices without draining the car battery.
Portable fan (USB-charged): Perfect for warm nights.
Magnetic mosquito nets for doors and windows: These keep insects out but let air in.
Foldable camping table and chairs: For outdoor meals and work.
Long storm lighter: Makes it easier to light gas stoves and fireplaces.
6. Top 16 Safety and Vanlife Essentials You Can't Forget
Safety and Security:
Steering Wheel Lock – This makes it harder to steal your van.
Personal Defence Spray – For added security.
Practical Vanlife Accessories:
Portable Shower – For camping without shower facilities.
Solar-Powered Power Bank – Charge your devices eco-friendly.
Portable Solar Panel - Charge your device even more efficiently
Emergency Radio with Solar / Hand Crank Charging – For power outages and emergencies.

Now, your campervan is ready for adventure! 🚐💨
With a safe and well-equipped campervan, you can enjoy vanlife without worries. Whether you're camping in nature, driving through Europe, or living full-time in your van, having the right gear is essential.
🚀 Ready for the next step? Check out our detailed guides for each building phase, and don't forget to explore our recommended products!


Guide
Your resource for camper van electrical systems.
Contact us
Support
© 2024. All rights reserved.