
Campervan Electrical Systems: Wiring Made Easy
Build your campervan electrical systems with our guide! From wiring and fuses to batteries, we've got everything you need to light up your campervan journey!
10/15/202414 min read
Light Up Your Campervan:
Electrical System Guide
The Basics of Understanding and Building Your Own Electrical System for a Campervan
Which battery type is best for your camper?


How Wiring Tips for Campervan Electrical System
How to The best ways to charge your batteries
How to determine your leisure battery capacity requirements
How to assess your power usage
Welcome to the Ultimate Guide for Building a Campervan Electrical System!
Ready to light up your campervan adventures?
Whether you're a wiring wizard or a complete novice, our guide will illuminate the path to a perfectly powered campervan. From choosing the right batteries to mastering the art of wiring, we've got you covered. Let's spark some excitement and get your campervan glowing!

🔋 Leisure Battery
After living full-time in our van across the UK, we upgraded our battery bank to 2x 216Ah TN Power lithium batteries. This upgrade gave us far more usable battery capacity and shaved off 50 kg in weight! These days, we include Fogstar Drift lithium batteries in all of our electrical kits and highly recommend them.
🔌 DC-DC Charger
Because we’re living off-grid most of the time, we needed to make sure we could efficiently charge our leisure batteries even when the sun wasn’t shining. We installed a 30A battery-to-battery (B2B) charger, which charges our leisure bank while we drive – a game changer for UK winter vanlife.
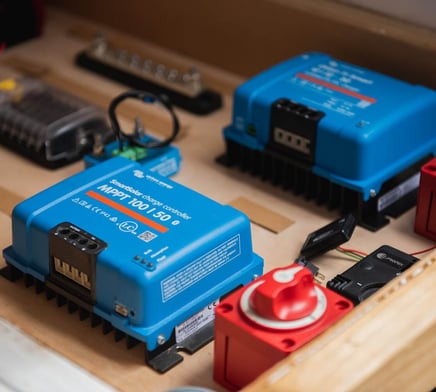
☀️ MPPT Solar Charge Controller
We use a Victron Energy MPPT 100/50 charge controller to harvest energy from our solar panels. MPPT controllers are far more efficient than PWM types, and the SmartSolar range lets you monitor your charging data straight from your phone.
Campervan Lighting Components
We installed both ambient and task lighting in our build. LED strip lights are wired to a switch for soft ambient lighting, and we added 10x 3W spotlights – 6 in the kitchen, 4 in the bedroom – for functional lighting. The lights output 230 lumens and a warm white glow.
For switches, we went with toggle-style ones from Dowsing & Reynolds – stylish and super satisfying to click. We also installed pattress boxes behind each switch. Similar 12V lights and switches are available in our webshop.
Cables, Connectors and Accessories
There are lots of small but essential parts you’ll need to complete your electrical system. Things like busbars, fuses and switches need to be rated to handle the current in your setup. Here are just some of the parts we used:
Blade fuses
MEGA/MIDI fuses
On/off switches
Busbars
Fuse holders
Crimp terminals
Tools for Installing a Campervan Electrical System
Make sure you’ve got the right tools before you start your electrical install. These were essential in our build:
Crimping tool (0.5–6mm²)
Heavy-duty crimper (10–120mm²)
Cable cutters (0.5–60mm²)
Sizing Your Campervan Battery Bank, Solar Array & B2B Charger
Sizing your campervan’s electrical system is all about understanding your daily energy use. Each part of your setup – from batteries to solar panels to chargers – needs to be appropriately rated to match your power demands.
🔋 Calculating Your Leisure Battery Size
The first thing to work out is how large your battery bank needs to be. This will influence the rest of your system. Here’s how we did it:
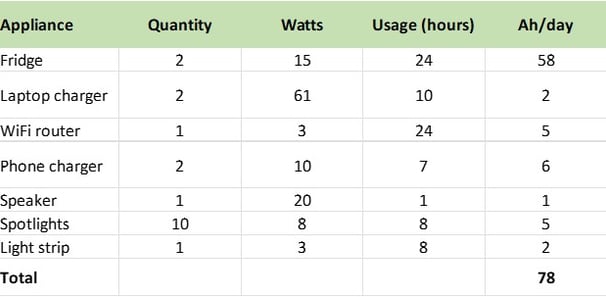
Make a list of every electrical device you plan to use daily in a spreadsheet.
Use this formula to calculate how much each one consumes:
Watts ÷ Volts = Amps
For example: a 60W fridge on a 12V system → 60 ÷ 12 = 5AhEstimate how many hours per day each item will run.
Multiply amps by hours to get daily usage in Ah/day.
Add everything together to get your total daily usage.
💡 Use the average power draw, not the maximum. Our fridge is rated at 60W, but only draws a quarter of that on average. You can usually find this by searching online or checking if the appliance lists Wh/day (watt-hours per day).


☀️ Sizing Your Campervan Solar Panel Array
Once you know your daily consumption in amp-hours (Ah), you can calculate how many solar panels you need to recharge that amount. Here’s a rough rule of thumb to help you:
1W of solar = ~0.3Ah per day in UK/European conditions
So for example:
You use 100Ah/day →
100Ah ÷ 0.3Ah/W = at least 330W of solar panels
This rule accounts for average solar conditions across the UK and Northern Europe, assuming panels are mounted flat on your roof. In sunnier regions like Southern Spain, you could generate closer to 0.4–0.5Ah per watt per day.
✅ Our setup: 3x 100W panels = 300W total → yields ~90Ah on a good day in the UK
⚠️ Keep in mind: bad weather can cut solar input by 50–90%, especially in winter months.
This post contains affiliate links, which means that if you click on a product link and purchase something from the retailer (Amazon, eBay, etc.), we receive a commission. The price you pay is not affected, whether you use the affiliate link or not. By using these links, you help us continue to create free, educational content! To understand our guidelines regarding content, affiliate commissions, and responsibility, please read our terms of use.
⚡ Pure Sine Wave Inverter
Remote work is a big part of our lifestyle, so powering 230V devices like laptops and cameras was non-negotiable. Our Victron 500VA Pure Sine Wave Inverter lets us power up to 500VA worth of AC appliances entirely off-grid.
🔧 12V Fuse Box
For 12V appliances like our fridge and water pump, we use a Blue Sea Systems 12V fuse block. It allows up to 12 different circuits to be connected cleanly and safely to your system.
📱 Battery Monitor
One of the most important tools in your van’s electrical system is a battery monitor. We use the Victron BMV Smart, which shows us the state of charge, loads in and out, and connects directly to the Victron app.
How to Install an Electrical System in a Campervan
Installing the electrical system in your campervan is arguably one of the most intimidating and complex parts of any van conversion. We’ve spent hundreds of hours learning about campervan electrical systems to write our book and develop our bespoke electrical design service. In this post, we’ll guide you through everything we installed in our own Sprinter campervan, and the products we chose to build it with. We’ll also explain how to size the main components, and share an example wiring diagram so you can learn exactly how to install an electrical system in a campervan.
By the end of this article, you’ll be one step closer to mastering your van conversion and understanding how to power your off-grid life.
Key Components in a Campervan Electrical System
Below is a complete list of all the electrical components we purchased for our campervan electrical system. We’ll go into detail on how to install an electrical system in a campervan, and explain how we sized the battery, number of solar panels, and the inverter.
Solar Setup for a Campervan
🌞 Solar Panels
We mounted three 100W Renogy panels on our roof for a total of 300W of solar. These days, we recommend using the 115W Victron panels for better performance and compatibility.
🧱 Solar Panel Brackets
To fix your solar panels to the van, L-brackets are the most secure option. These allow for a mechanical installation by screwing directly into the van’s roof frame.
🛠️ Solar Cable Gland
We used Scanstrut cable glands to safely feed solar cables into the van without risking leaks. These are available in multiple formats and are what we recommend in our shop.
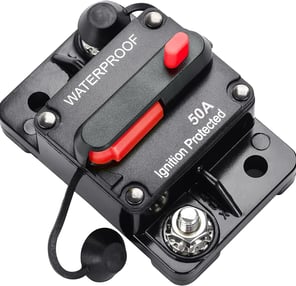
🚗 Sizing a DC-DC (Battery-to-Battery) Charger
We always recommend installing a DC-DC charger in addition to your solar setup. These let you charge your leisure batteries while driving, which is a lifesaver in the UK climate.
Here’s how to size it:
Charger output (A) should be 0.2C–0.3C of your battery bank (in Ah)
Example:
You have a 200Ah lithium battery
0.2C = 40A → use a 30A or 40A charger
✅ Our setup: 2x 216Ah batteries → 432Ah total
→ 0.2C = ~86A → we use a Victron Orion-Tr Smart 30A DC-DC charger
Note: Many alternators can’t handle large DC-DC chargers without upgrades. Always check your vehicle’s alternator rating.
⚡ Sizing Your Inverter
Inverters turn your 12V DC battery power into 230V AC power, just like at home. These are essential if you want to run laptops, kitchen appliances, or even a small electric heater (though we don’t recommend the last one!).
How to size your inverter:
List your 230V devices
Add up their simultaneous power draw in watts (W)
Choose an inverter with a 20–30% safety buffer
Example:
Laptop (65W) + Blender (300W) = 365W
→ 365W × 1.3 = ~475W → get a 500VA inverter
✅ Our setup: We use a Victron Phoenix 500VA Pure Sine Wave Inverter
This covers all our remote work gear and small kitchen appliances.
Designing Your Campervan Electrical System
Designing a campervan electrical system doesn’t have to be overwhelming – especially if you break it down into key components and size everything based on your actual needs. Whether you’re aiming for a fully off-grid campervan with solar panels and lithium batteries, or just want enough power for weekend getaways, the principles are the same:
Understand your daily energy use
Size your battery, solar, and charging sources accordingly
Choose reliable components that match your budget and needs
If you're unsure where to begin, check out our free campervan wiring diagrams, shop our pre-built kits, or grab our full Campervan Electrics Handbook – designed for total beginners who want to DIY with confidence. ✌️
How You Use Your Van Affects Battery Size
How often and how off-grid you plan to travel will determine the battery bank you need. There are two key considerations:
Frequency of van use (full-time, seasonal, or weekends)
Type of use (fully off-grid, campsite-based, or mixed)
These factors help determine how many days of power you need without recharging.
For example, since we planned to live full-time off-grid in our campervan, we wanted at least 3 full days of power without charging. That way, we’d be covered even during cloudy weather (no solar) and when staying parked for multiple days (no alternator/B2B charging).
👉 If you mostly stay at campsites or only use your van on weekends, a 2-day battery bank might be enough. But for most people, we recommend designing your system for at least 3 full days off-grid.
To be extra safe, we sized our battery bank to handle 4 days of autonomy, giving us:
94Ah/day × 4 days = 376Ah usable capacity
Choosing the Right Leisure Battery
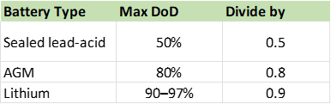
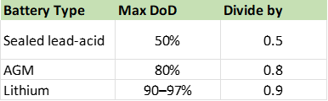
Different battery types allow for different depths of discharge (DoD)—that’s how much of the battery’s capacity you can use before recharging.
The two most common types for campervans are:
AGM batteries (Absorbent Glass Mat)
Lithium leisure batteries
💡 Tip: The wattage listed for an appliance should be the average power draw, not the peak. For example, our fridge is rated at ~60W, but its average usage over a day is only about 15W. Look for the average value in Wh/day or use online resources to estimate it.
Comparing AGM vs Lithium
AGM batteries are affordable and easy to install.
Lithium batteries are lighter (up to 50% less weight and space), longer-lasting, but 4× the cost.
So what should you choose?
If you only use your van for weekends and holidays, AGM batteries might last 8–10 years. But for full-time vanlife, they might only last 3 years. In that case, lithium is a smarter long-term investment.
We opted for lithium leisure batteries because we live in our van full-time and didn’t want to replace batteries every few years.
Here's a rough comparison of 100Ah batteries:
AGM 100Ah 12V
Budget Lithium 105Ah 12V
Premium Lithium 100Ah 12V
Since we chose lithium, we divided our required capacity (376Ah) by 0.9:
376Ah ÷ 0.9 = ~417Ah total battery capacity needed
So we installed 2× 216Ah TN Power lithium batteries, giving us a total of 426Ah.
👉 Want to dive deeper into lithium batteries? Read more in our complete campervan electrical guide
Sizing Your Solar Panel System
Now that we know our battery bank size, we can figure out how much solar power we need to recharge it effectively.
First, convert Ah to Wh:
Amp-hours × Voltage = Watt-hours (Wh)
376Ah × 12V = 4512Wh
To fully charge the batteries in one day (assuming 8 hours of sunlight):
4512Wh ÷ 8h = 564W solar array
But realistically, you won’t need to fully recharge your battery bank daily—especially if you’ve sized it to last 3+ days. Plus, you’ll likely have other charging options like shore power or a battery-to-battery (B2B) charger.
We knew we could only fit 300W of panels on our roof, so we calculated how long it would take to fully charge:
4512Wh ÷ 300W = 15 hours of full sun
We installed 3× 100W Renogy panels. However, we actually recommend Victron or JA Solar, as we’ve found their performance to be more consistent.


Choosing the Right Solar Charge Controller
Once you’ve picked your solar panel size, you’ll need a solar charge controller (like Victron MPPT). These are rated based on:
Maximum voltage
Maximum current (amps)
Maximum PV array size (watts)
Make sure to size your controller based on the combined voltage and current of your panel setup.
What Size DC-DC Charger Do You Need?
When adding a battery-to-battery (B2B) charger, consider the following:
What’s the voltage of your starter battery and your leisure battery system?
How fast do you want to charge your batteries?
Do you need an isolated or non-isolated charger?
✅ Example: If you have a 12V starter battery and a 12V leisure system, you need a 12V to 12V DC-DC charger.
To estimate charging time:
Usable battery capacity ÷ B2B current = hours to charge
Example:
100Ah ÷ 50A B2B = ~2 hours (roughly)
⚠️ In reality, charging isn’t this linear because B2B chargers go through different stages: bulk → absorption → float. But this calculation gives you a good ballpark figure.
For a detailed breakdown of B2B charger sizing, check our full electrical guide linked above.
Electrical System
You didn’t come this far to stop
Our Campervan Wiring Diagram (UK Version)
Our campervan wiring diagram can help you understand how to install an electrical system in your own campervan. Our setup includes:
Power input via a battery-to-battery charger and a solar charge controller
Power output via a 12V fuse box and a 500VA inverter
We chose to install an inverter in our campervan electrical system so we could use 230V power inside our van. This allowed us to install standard plug sockets via a consumer unit, so we could charge laptops, phones, and any other mains-powered appliances we might want to use.
Here's a full list of the appliances we connected in our campervan:
❗ VA vs W – What's the Difference?
Most inverter manufacturers rate their products in watts (W), but Victron uses volt-amperes (VA) instead. VA represents apparent power, while W is real power. The difference matters when designing your system.
To learn more, check out our post where we explain the VA vs W difference and how it affects your choice of inverter or inverter/charger combo.
We highly recommend models like the Victron Phoenix, as they are pure sine wave and come with built-in protection. If you overload a cheap inverter, it may just fry itself—but Victron inverters will simply shut down and give an alarm.
⚠️ One final warning: Cheaper inverters often advertise their peak wattage, not their continuous output. For example, a "3000W" inverter might only hold that for a few minutes. Victron inverters clearly state both continuous and peak ratings (e.g. our 500VA model can handle 900VA peak for up to 5 minutes).
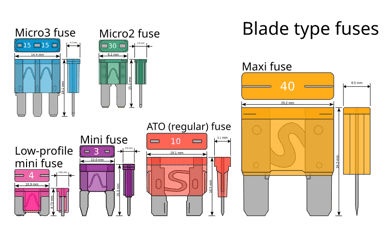
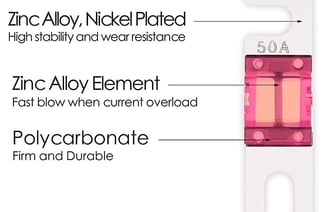
What is the Difference Between Fuses?
AGC and MDL Fuses [0.25A - 30A]
AGC and MDL fuses are slow-blow fuses. They are constructed with a glass tube and brass ends. The glass tube provides a visible indication when the fuse blows. These are inexpensive fuses used for small appliances.
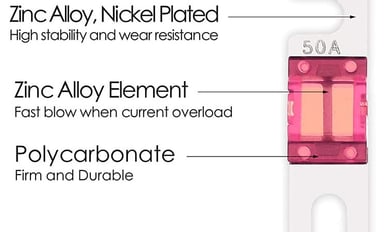
Blade Fuses [1A - 80A]
Blade fuses are the most common fuses found in vehicles. They are inexpensive, colour-coded, and easy to replace. When the fuse blows, it is visible inside the plastic casing.
Van converters tend to use blade fuses in their 12V campervan fuse boxes. They are used with small to medium-sized appliances. ATO fuses are designed to handle 1A to 30A, and MAXI fuses are designed to handle 30A to 80A.
Terminal (MRBF) Fuses [30A - 300A]
Terminal fuses are almost exclusively used to protect leisure batteries. They are rated to handle high currents and conveniently attach directly to the battery terminals.
MIDI, MEGA, ANL, and Class T Fuses [30A - 400A]
These fuses are all designed to handle high currents. Most of them are inline fuses, meaning they are installed on the cable. In van conversions, we use ANL and MEGA fuses to protect items like inverters and battery chargers.
MIDI fuses are designed to handle 30A to 200A, MEGA fuses are designed to handle 100A to 300A, ANL fuses are designed to handle 35A to 400A, and Class T fuses are designed to handle 110A to 400A.
Our Finished Campervan Electrical System
Once we had sized our leisure batteries, solar array, inverter, and B2B charger, we calculated the size for all cables, fuses, busbars, and breakers. Here's a breakdown:
Busbars and cables: Based on the maximum current in the system
Fuses: Rated for each specific appliance or component (usually specified in manuals)
Cable size: Based on the amp draw and total length of each run
After calculating everything, we installed the full system! We built a system board to mount all components on, with pre-drilled holes for cable routing. We also included a small control panel for:
Gas level sensor
Water pump switch
Thermostat
Battery monitor
You might choose to mount your controls somewhere more visible or accessible—totally up to you!
FAQ
What cable size did you use for your 12V lights?
That depends on the distance to your fuse box and the amps your lights draw, but generally 1.5mm² cable is enough. We recommend buying from eBay as shops like B&Q tend to be overpriced for wiring gear!
When did you install your electrics—before or after insulation and cladding?
We installed our electrics after insulation but before cladding. That way, if you ever need to access your wiring, you can remove a cladding panel to reach it.
Why did you use a 50A solar charge controller with a 300W system?
When sizing a charge controller, add a 25% safety margin to the panel current. Each panel is rated at 5.72A, so with 25% added, that’s 7.15A per panel. Three panels = 21.4A total input. That’s why we chose the Victron 100/30 controller. Hope that clears it up!
Where do you store your leisure batteries? We want to avoid long cables from the starter battery.
Ours are under the bench seats. But if we did it again, we’d probably put them in the rear storage area (garage)—they’d get better airflow and could be placed next to the rest of the electrical setup. That’s actually a pretty standard layout in campervan conversions.


12V Appliances:
Boot lights
2 ventilation fans
Dometic CRX50 fridge
Dometic CFX3 45 fridge
Water pump
LPG Propex 2000 heater
230V Appliances:
3 double sockets
1 single socket
10x 3W spotlights
LED strip lights
Hob ignition
Guide
Your resource for camper van electrical systems.
Contact us
Support
© 2024. All rights reserved.